How to Batch Watermark Photos

With BeFunky's Watermark tool, it’s easy to add your watermark to photos and designs. It’s a quick and efficient way to watermark photos on a one-by-one basis. But what if you have a ton of photos to watermark and want to speed up your workflow? Before you start scouring the internet for the perfect batch watermarking tool, we’ve got the perfect solution right in the Batch editing feature of our Photo Editor!

The handy little Batch button at the top of our online Photo Editor allows you to edit and watermark hundreds of photos at once! And rest assured that your watermarks will be ultra-precise and cohesive on every single photo you want that watermark on.
What Kind of Watermark Should You Use?
If you’ve been watermarking photos for a while, you may already have your signature watermark locked in. It could be your brand or blog logo, a stylized signature, or anything that best represents your work. A watermark is essentially like an artist signing their completed piece - a way for people to know who originated the work and give credit where credit is due.

Most watermarks are created on a transparent background for seamless placement on top of the image or design. If you’re still in the design process of your watermark, make sure you create it on a transparent background and save it as a .png to keep the background seamless. Here’s a great tutorial on how to create your own watermark on a transparent background.

Once you’ve got your watermark designed, all that’s left to do is add away! The best thing about BeFunky’s Watermark tool is that it stores your watermark and ideal settings as a preset once you upload it. That way, all you have to do is check a box when you want your watermark added - no need to worry about individual placement, selecting opacity, and other settings when we can automate the process for you!
How to Batch Watermark Photos
To add watermarks to photos as a batch, head to BeFunky’s Photo Editor and click the Batch button at the top of the screen.

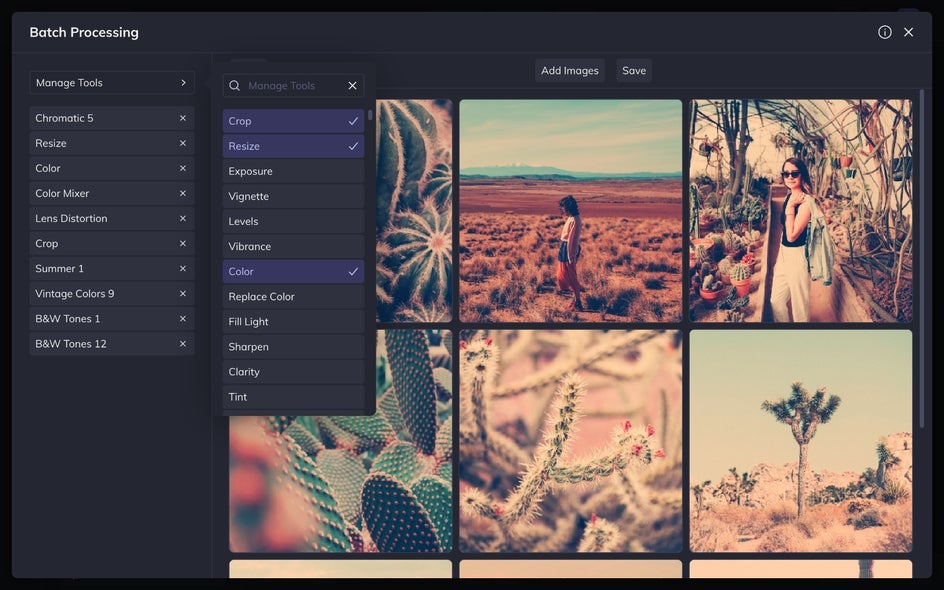
This feature can be used in tandem with a bunch of our most popular tools – so you can resize images, add photo filters, and more with a single click. The Batch Processing menu will open and allow you to upload multiple photos by selecting the Add Images button or simply dragging and dropping your image files into the interface.

Once you've uploaded your photos, feel free to edit them all at once using BeFunky’s photo editing tools and effects. To do so, click the Manage Tools button and select any tools you’d like to edit your photos with. Any tools selected will be added to your quick menu on the left side of the Batch Processing menu, and you can click them one by one to edit your images. If your photos have already been edited and you simply want to watermark them all at once, you can feel free to skip this step.
When you’re ready to batch watermark photos, click the Save button at the top of the Batch Processing menu. A Save Images menu will appear, allowing you to choose your save options and name your files accordingly. After choosing those options, check the Use Watermark box.
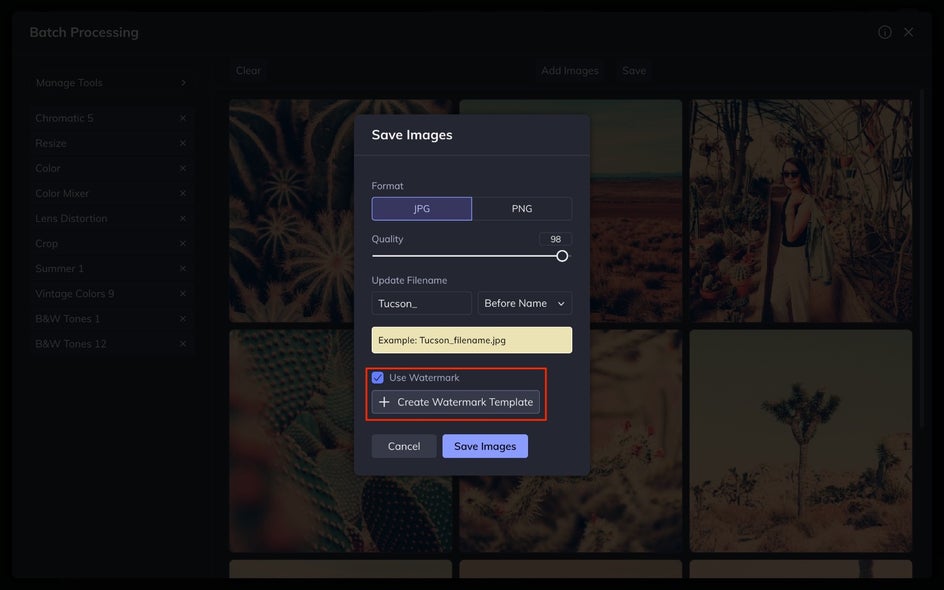
If you’ve uploaded your watermark to the Watermark tool before, you’ll see your watermark preset appear when you choose the Use Watermark box. Simply click on it to use it. If it’s not yet uploaded, choose Create Watermark Template and new options will appear to help you turn your watermark into a preset with all the options you want.
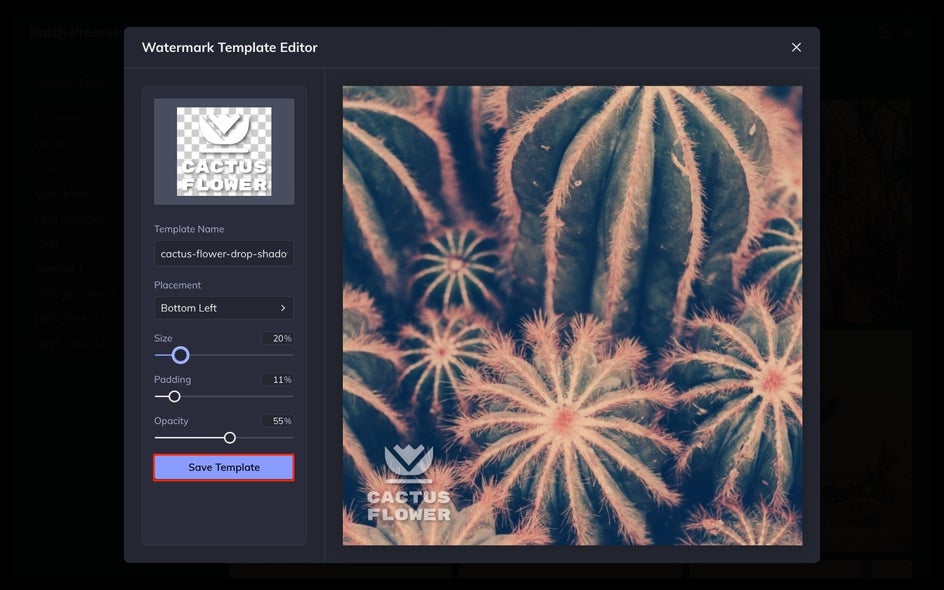
When the Watermark Template Editor appears, click Upload Watermark. Give your watermark a name by typing into the Template Name field, then select the general placement you’d like using the Placement menu.

Next, use the sliders to adjust the Size of the watermark, the Padding amount, and the Opacity. All of these adjustments will help you customize the way your watermark looks on every photo you place it on. When it looks perfect, select the Save Template button.
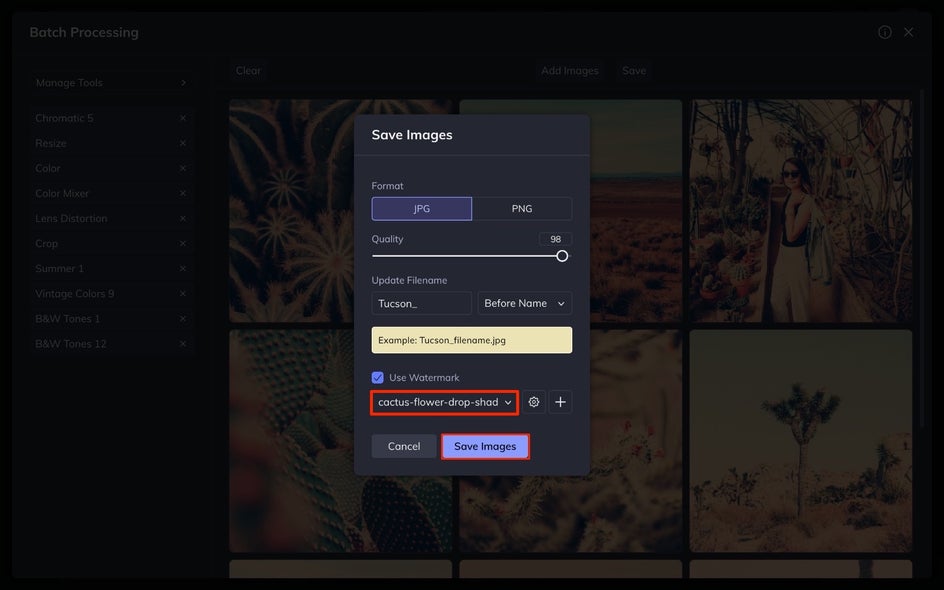
With your watermark now saved as a preset in our Watermark tool, you’ll be able to add it to every photo you want. Simply select Save in the Save Images menu and your images will all include your watermark with the chosen settings, all packaged in a handy zip folder for easy delivery.
The Easiest Batch Watermark Tool
The best part about the Watermark tool is that you can save multiple presets. Create a watermark for photos with dark backgrounds and a watermark for photos with lighter backgrounds to give yourself multiple options and then choose the appropriate one during the save step. Batch watermarking your photos just got a whole lot easier!