How To Brighten Photos With The Levels Tool

When it comes to capturing photos, the general rule of thumb is to under-expose the shot rather than over-expose. This is mainly because it’s much easier to brighten a photo in the editing process than to fix blown out highlights. While the Exposure tool might be your go-to for brightening photos in the editing process, we’ve got a tool that’s even more powerful for fixing exposure: the Levels tool.


The Levels tool is an exposure-correcting powerhouse, and you’ll find it at the bottom of the Edit panel in BeFunky’s Photo Editor. If you haven’t used it before, the terms in the Levels menu might look a bit foreign. It’s actually easier to use than it looks, and much more detail-oriented for brightening photos the way you want. With a few slider adjustments and a little know-how, the Levels tool is going to be your new favorite!
How The Levels Tool Works
In a nutshell, the Levels tool helps control all of the exposure levels in your photo: Shadows, Highlights, and overall Brightness. It’s a versatile tool that can also help you create Matte Photo Effects, enhance shadows, and in this case, brighten your photo while bringing out tons of detail. The Levels tool is a bit more meticulous than the Exposure tool, so it’s perfect for creating a naturally bright look to your images.
There are five different sliders in the Levels tool menu that work together to help balance exposure, but the top three sliders are the most important for balancing and brightening. The Min Input corresponds to the shadows in your photo. The Gamma slider controls your overall Brightness. And the Max Input slider corresponds to the highlights in your image. All three work together to help you brighten photos without blowing out the details.
When To Use The Levels Tool
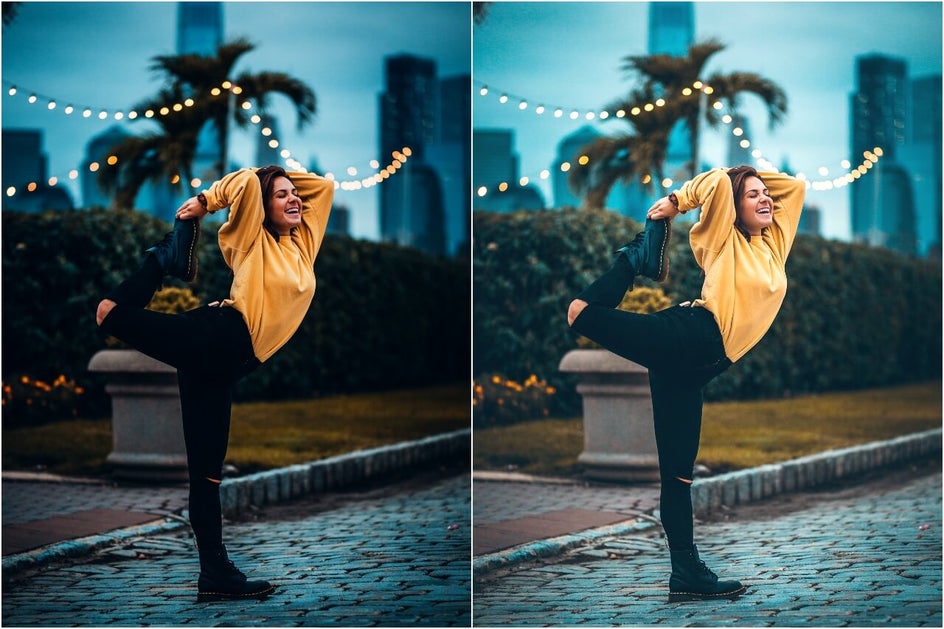
Anytime you need to make your photo a bit brighter is a great time to use the Levels tool, but there are a few cases where it really stands out. We wanted to share some before and after inspiration with you, because there’s no photo too underexposed for fixing with Levels:
Brighten Muted Highlights
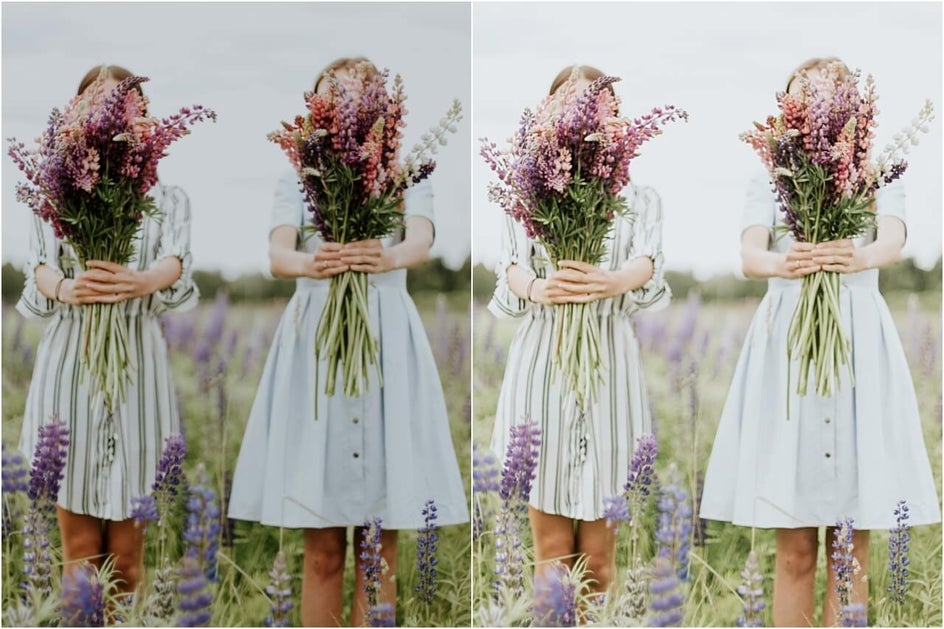
Sometimes you take a photo and the whites are so muted that they end up looking more brown or grey. If you’re going for a more crisp, airy look to your photos, the Levels tool can help intensify the highlights without going overboard.
Bring Detail Out Of Shadows
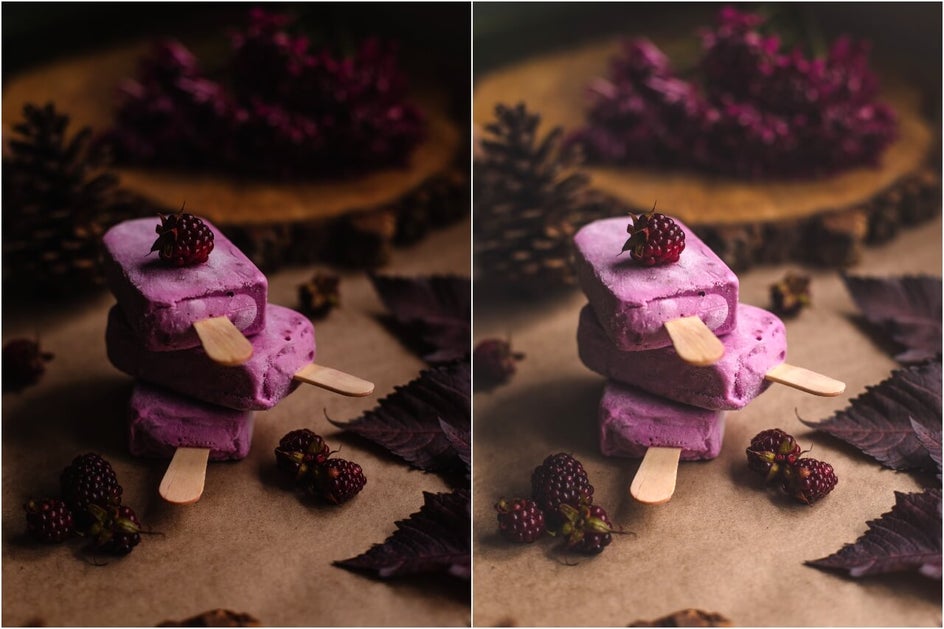
Dark food photography is a beautiful trend, but sometimes underexposing the shot can make you miss details as they blend into the shadows. The Levels tool can help bring out those details while maintaining that same moody vibe.
Fix An Underexposed Image
With outdoor photography especially, there isn’t always a way to balance exposure during the capturing process without creating a grainy shot. For times like these, you end up with a (maybe even slightly) underexposed image. It’s so easy to enhance images like these with a few slider adjustments in the Levels tool.
Whatever kind of photo you need to brighten, the Levels tool is your best bet for meticulous photo brightening. We’ll walk you through how to use it below, and you’ll be a pro at brightening photos before you know it!
How To Brighten Photos With The Levels Tool
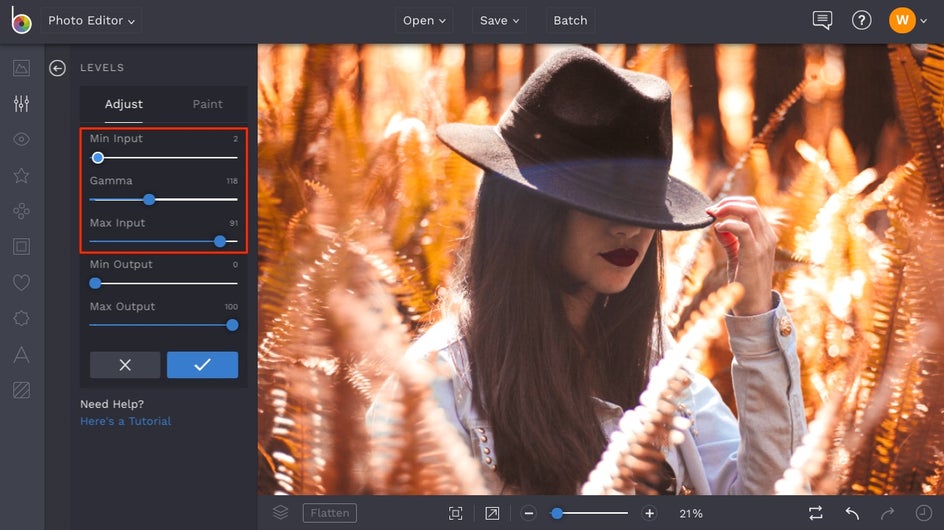
To get started, head to BeFunky’s Photo Editor and upload your photo using the Open button at the top of the page, or simply drag-and-drop an image file into the interface. Scroll down to the bottom of the Edit tab and click on the Levels tool.
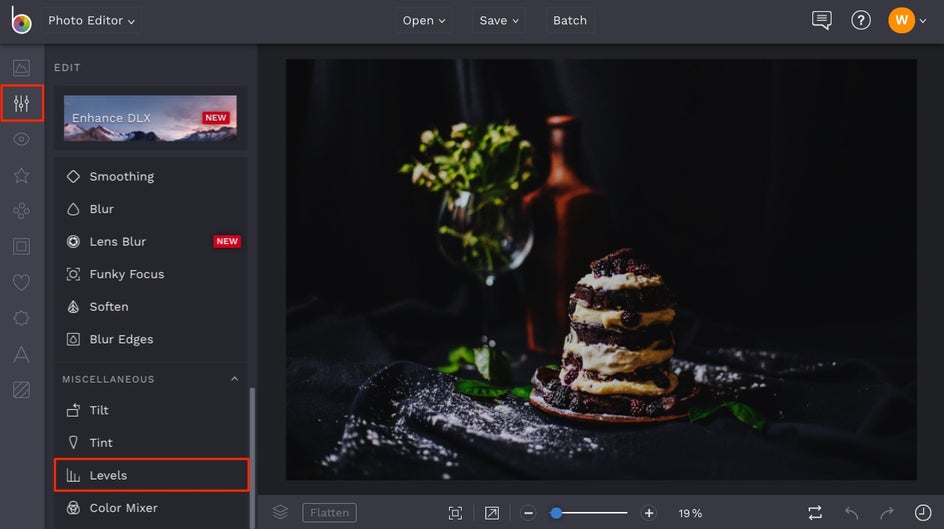
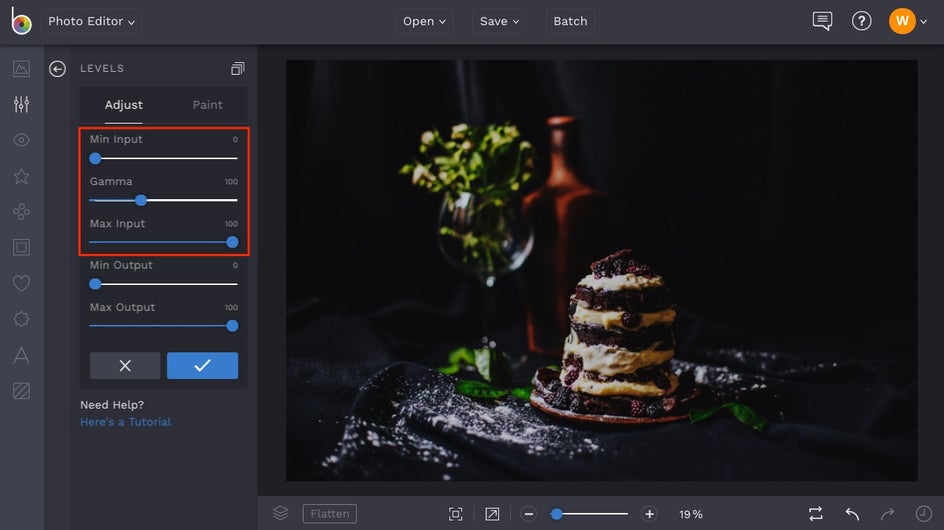
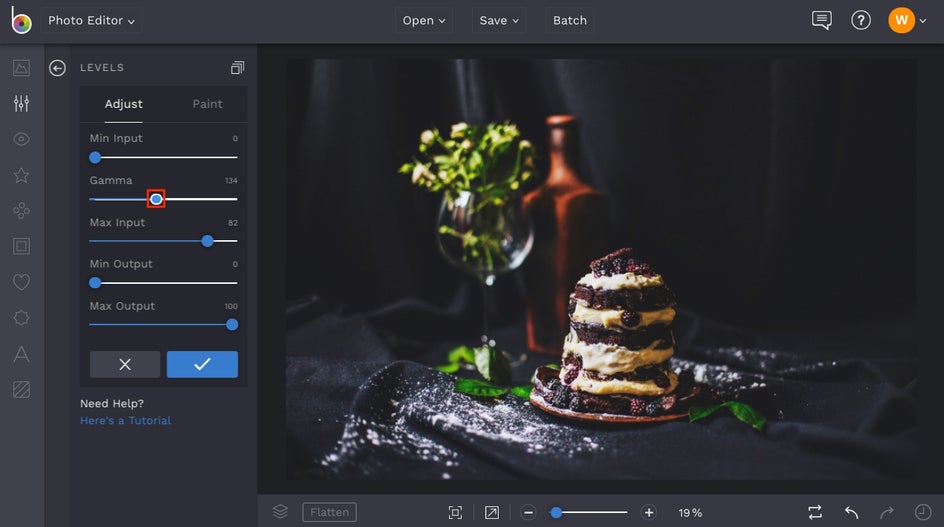
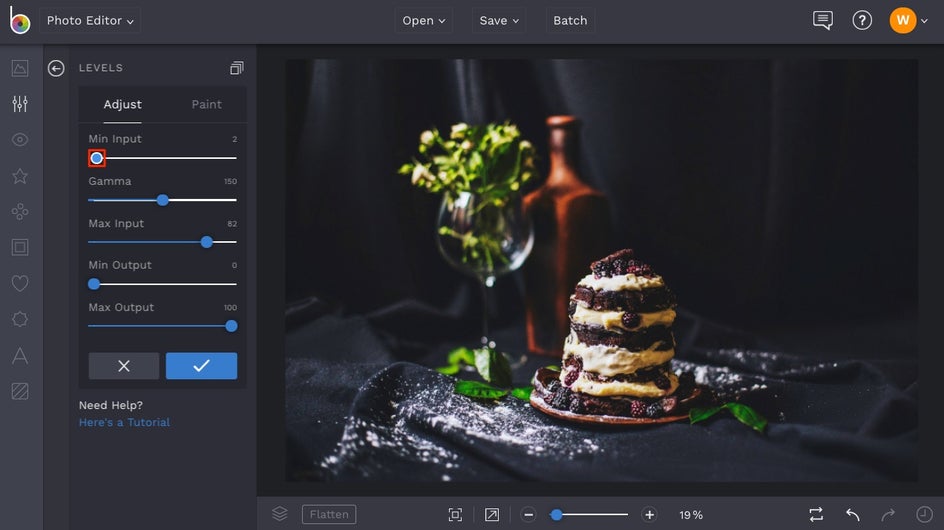
Once you have the Levels tool open, you’ll see a menu with five sliders. Since this tutorial is all about brightening photography, we’ll focus on the top three: Min Input, Gamma, and Max Input. In reverse order, the Max Input slider controls the highlights in your image - a great starting point for brightening. The Gamma slider controls the overall brightness of the image, which is a perfect next step. The Min Input controls the shadows in your image, and since we’ll first want to focus on brightening the photo before adding the shadows back in, this will be the last slider we use.
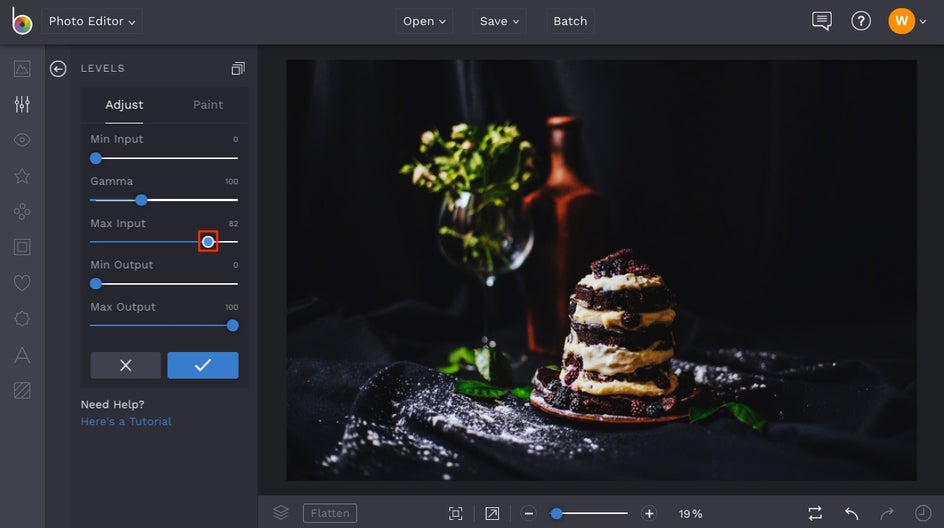
First, slide the Max Input slider to the left. This is best done in slight increments, and a good way to control this slider is to click on the blue circle and use your arrow keys to make ever so slight adjustments. Slide it to the left until the highlights are bright, but not blown out in any way.
Next, increase the Gamma slider by adjusting it to the right. More Gamma means a brighter photo overall, but if you overdo this, it can lead to a more matte look. Slide it to the right until the details begin to come out of the shadows without looking too matte.
Finally, slide the Min Input slider to the right in super slight increments. This will add more shadow back into the areas where it looks the most natural. You can continue increasing and decreasing the three sliders until the exposure looks absolutely perfect.
If you’re in a situation where you need to brighten only the background of your photo, keeping the exposure on the subject the same, you can use the Levels tool in Paint mode. First, get the background exposure looking the way you want using the above steps, then click the Paint tab (next to Adjust) in the Levels menu. Adjust the Brush Size and Brush Hardness to your liking, then paint over your subject to remove the exposure without altering your edits in the background. You can always paint over your subject, then click back over to the Adjust tab to increase or decrease the background exposure.

When everything looks perfectly bright, click the blue checkmark to apply your photo edits. From here, you can continue editing your photo. When you’re ready to save your photo, click the Save button at the top of the Photo Editor to save your image to your Computer or other chosen destination.
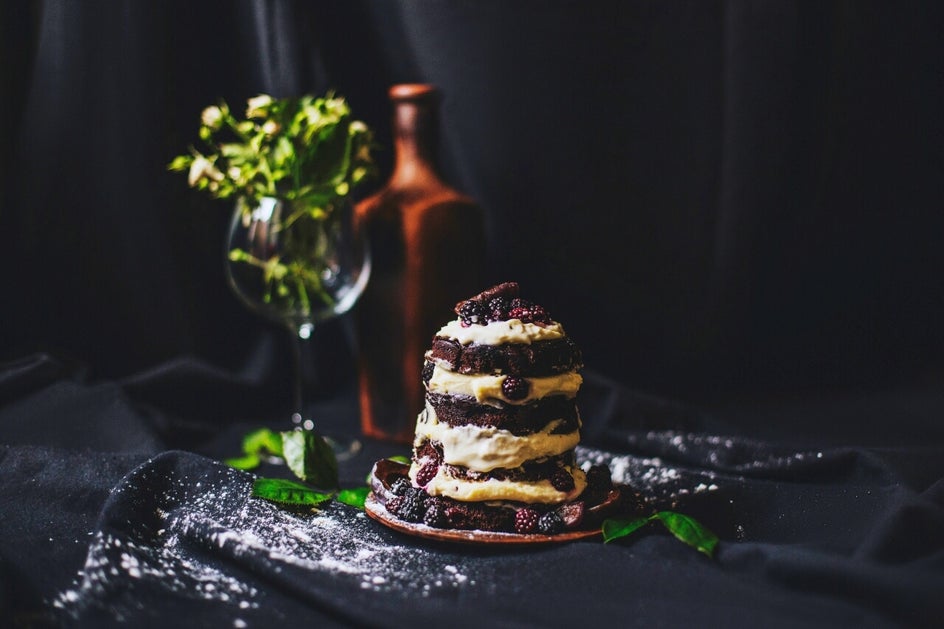
Final Results
See how much more detail we can get out of this photo with just a few adjustments in the Levels tool? It gives you total control over the exposure of your image, and we know it’s going to be your new go-to for brightening.

Ready to start brightening your photos? We bet you are! Click the link below and start experimenting with the Levels tool: